Description
This Master Recipe is intended to be scaled and customized. For a more specific recipe that has been scaled already to a 1 loaf pan batch see Chicken Bacon Chestnut Pâté or Country Pate with Duck Confit and Pistachio.
This recipe is set for a batch using 10lb of meat for easy scaling. To make a batch with 1lb of meat, multiply all ingredients by 0.1. To make a batch for 20 lbs, multiply all ingredients by 2.
Ingredients
10 lbs meat (pork, rabbit, chicken, goose, duck, and/or turkey), ground or chopped
1 lb fatty bacon (I always have this dry-cured bacon on hand )
1 2/3 lbs liver (soaked overnight in milk)
165 grams onion or shallot
3–4 cups chopped herbs (parsley, thyme, chives, tarragon, and/or sage)
120 grams garlic cloves
100 grams salt
9 grams curing salt #1 (optional, but recommended, see note 1)
19 grams black pepper, ground
10 grams (2 teaspoons) pâté spice (see note 2)
10 eggs
100 grams (11 Tablespoons) Flour
163 grams (11 Tablespoons) Brandy
192 grams (.8 cups) Cream
4–8 cups garnish (ie. diced chicken, pork loin or duck, duck confit chopped, nuts, dried fruit, sauteed mushrooms, olives, cooked vegetables)
caul, bacon slices, swiss chard leaves for lining terrine (optional, see note 3 below)
Instructions
Pâté Prep
Organize your materials and make sure you have a clean sanitized surface and equipment. You will need:
- 4-5 mixing bowls (1-2 large, 3 medium)
- Cutting board
- knife
- measuring cups and spoons
- Spatulas/ wooden spoons
- Terrine dishes (8 quart capacity/1 hotel pan for every 10lbs of meat)
- Parchment
- Plastic Wrap
- Tin Foil
- Probe thermometer
- Whisk
- Meat Grinder (optional)
- Meat Mixer (optional)
- Gloves (optional but nice)
- Kitchen Scale
- Weights for terrine (see instructions)
- Clean prep space
- Enough refrigerator space to fit terrines and allow for air circulation
The night before making this terrine, soak the liver in milk.
The next morning, drain, rinse and dry the livers. Trim them of any unsightly spots.
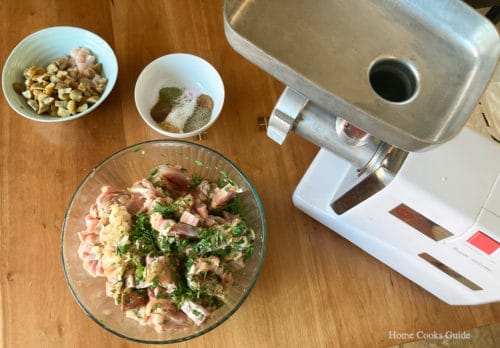
In a bowl, combine all the dry spices. Mix well. Add the meat, bacon and liver, onions, garlic, and fresh herbs. Let this mixture sit in the refrigerator for at least 1 hour or overnight. NOTE: If you are using ground meat, everything else should be minced. If you are grinding your own mixture, you can leave these things coarsely chopped and grind everything up together.
In another bowl, combine the eggs, cream, booze and flour. Whisk until all lumps are gone. Refrigerate until ready to mix with the meat mixture. This is your “Panade”
In another bowl, combine your garnishes.
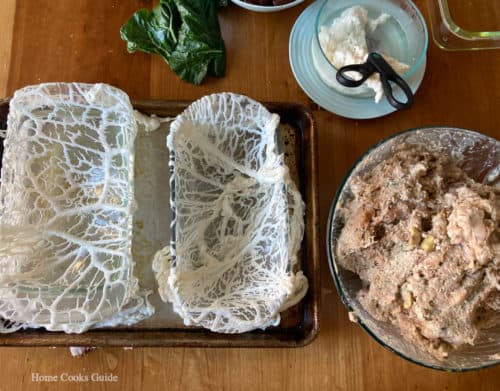
In another bowl, place your caul or bacon slices for lining the terrine dish (if using)
Grind the meat mixture (optional step)
If you are using ground meat, you can skip this step and save yourselves some time and dishes. However, grinding your own mixture gives you more control over the final texture of the product and is ideal if you are using your own game or farm-raised meat. I like to grind my own because I like some of the mixture to be ground fine and some to be coarser. I run everything through the medium or large die once and then I put about half the mixture back through for a second time. You could also switch between the coarse and medium die or the medium and fine die to achieve the same effect (but then you’d lose some time and end up with more dishes).
If grinding your own meat, put the auger, the die, and the tray of the grinder into the freezer or refrigerator at least 30 minutes before you plan to start grinding.
Assemble the cold grinder pieces with a mixing bowl set up to catch the ground meat.
Grind the meat mixture into the mixing bowl.
Mix the forcemeat
Add the panade to the meat mixture. Mix the meat and panade together until it is completely incorporated and the meat mixture begins to look tacky. This takes about 5 minutes. You can do this by hand for amounts less than 5 lbs. More than that and you probably will want to use a large stand mixer with a paddle attachment on low-medium or a special meat mixer used for sausage making.
Fold in the garnishes
Once the forcemeat is mixed, fold in the garnishes until evenly distributed.
Assemble the Terrine
Lay out the terrine dishes you are using to bake this pâté. I use bread loaf pans for small batches and a half or full size hotel pans for large batches.
Oil the baking dish. Line the dish with caul or bacon strips or professional grade plastic wrap (no need to oil terrine if going with this option) so that the lining material overhangs enough to fold over and cover the top when filled. You can also line it first with caul or professional grade plastic wrap and then with swiss chard leaves for a dramatic and tasty effect.
Fill the terrine with the forcemeat. Try to avoid air bubbles. I do this by spooning in a little bit at a time and pushing it down in the dish. Then add more and layer it up to the top. Fold over the overhanging caul or bacon strips (or plastic wrap). Cover with a layer of parchment paper followed by a layer of tin foil.

Bake at 300 F until a probe thermometer inserted into the middle of the pâté reads 140 F (if no poultry or poultry liver) or 155 F if using poultry (it will continue to cook after it comes out of the oven).
When the thermometer goes off, slowly pull the probe out, pausing to read the temp on its way up. Usually, the probe settles to the bottom of the loaf which is the hottest part. The middle will be less done and the top even less. Make sure the coolest part of the loaf (the top half) is reading 140 or 155 F.
Remove the loaf(s) from the oven. Keep covered for another 10 minutes. Remove the cover and let it cool to room temp over a period of 1-2 hours (if you have a cold and clean garage, you can move it there to speed the cooling process).
Wrap the terrine completely with plastic wrap, all the way around the terrine dish (aka “hotel wrap” in industry speak). Weight the terrine down. You can do this by cutting out a piece of cardboard to fit on top of the terrine and then add full cans from the pantry on top, or you can take another similar-sized loaf pan and fill it half way with ice water and place that on top. Refrigerate the weighted terrine for 12-24 hours. See note below for important food safety info.

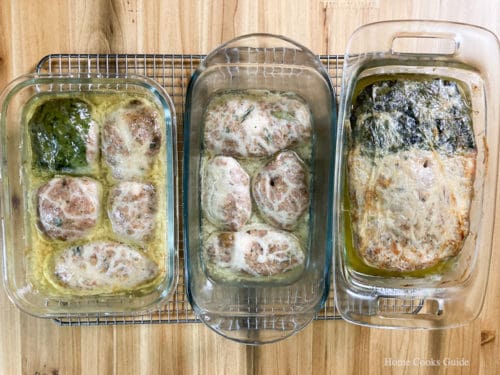
Left Pan: Crepinettes. One wrapped with swiss chard and caul. I’ll eat that one first. Middle Pan: Crepinettes. Right Pan: Pate Loaf, partially wrapped with swiss chard.
Portion and Serve Terrine
Invert the terrine onto a cutting board and slice it into portions. At this point, you can serve it or vacuum seal/wrap in several layers of plastic wrap and freeze it. Vacuum sealed, this product will last 6 months or more in the freezer. Wrapped in plastic wrap, 2-4 months.

Equipment

| Kitchen Aid 6 Qt Stand Mixer |
Buy Now → Buy Now →
  Buy Now →
| Kitchener Heavy Duty Electric Meat Grinder |
Buy Now →Notes
1) IMPORTANT FOOD SAFETY CONSIDERATIONS:
If you are using the curing salt, you have 15 hours to get your terrine cooled down from 140 F – 41 F or below. If you are NOT using the Curing Salt, you have only 4 hours to get your terrine from 140-41 F. If you are making a 2-quart loaf pan of pâté, this is pretty easy to achieve without much effort. However, if you are making a larger batch using half or full-size hotel pans and placing it in a tightly packed refrigerator, you would be surprised how long food can stay above 41 F and in the “danger zone”. Do not attempt to make large batches without first having plenty of fridge space (like an extra empty fridge for projects like I have) and plenty of ice. You will want to weigh the terrines down with ice water to accelerate the cooling process.
2) Kara’s Pâté Spice
- 25 grams (1 2/3 T) ground white or black pepper
- 12 grams (2 1/2 t) ground nutmeg
- 12 grams (2 1/2 t) ground ginger
- 2 grams (1/2 t)ground cloves
- 10 grams (2 t) of ground coriander
- If you want to use a pre-made spice blend instead, look for “Savory Quatre Épices”
3) Lining the Pâté
Caul fat is my preferred method for lining terrine dishes. It is cool and easy to work with though hard to find. You’ll want to ask at the grocery store meat counter or specialty butcher if they can order some for you. It may come in a large block which you would want to repackage into usable portions and then freeze for later use. Bacon slices are labor-intensive and expensive but delicious. The bacon also shrinks as it cooks so make sure the pieces overlap. Ask at the meat counter for thinly sliced bacon for this purpose. I like using swiss chard leaves either under caul or under professional-grade plastic wrap. This adds visual appeal to the terrine. The shelf life is shorter though so keep that in mind and only use this method on terrines that are going to be consumed within a week or so. You can also skip caul, bacon, or swiss chard and use only professional-grade plastic wrap. No need to oil the terrine if you use this option. This is not my preferred method as cooking in plastic wrap kind of hurts my soul, but I have done it in a pinch with fine results.

